Expansion on Data Flow through SwiftUI and iOS traditionally
This has been on my mind. I have learnt a few things in the past few weeks. One is to calm down and focus on what really matters. Second is to find a Single Source of Truth for my knowledge. The Internet is littered with tutorials on how to use SwiftUI. But they all explain it simply and with small examples. In this tutorial. Which will be long. You have been warned!!. I will try to go through all the nitty gritties of passing data through SwiftUI. Yes. It will be a challenge. But stick with me and I promise you’ll get through this.
How on Earth do I pass data through SwiftUI.
1. Watch the WWDC 2019 videos on SwiftUI and do the Apple SwiftUI tutorials.
Stop trying to find short simple hacks on the Interwebs about how to build a great interface in 10 min. Focus on doing it right. Apple WWDC videos and tutorials should be your single source of truth when it comes to learning about SwiftUI and Combine.
Let’s start.
Apple boasts that SwiftUI is the shortest path to a great app because it manages the complexities of UI development. In this post we will test whether this is really true.
SwiftUI talk from WWDC boasts.
- They mention we have a simple but powerful tool at our disposal to flow data through the view hierarchy.
- Which can help us achieve not only beautiful but well behaved applications.
- They can show us how SwiftUI updates our view hierarchy to guarantee that we always have a correct and consistent view of our data.
- A mental framework for understanding our data.
| Data is all the information that drives your UI. |
Data can come in the form of a network request, modelled data, state data such as a toggle, etc.
Apple worked on two guiding principles:
Every time you read a piece of data in a view. You are creating a dependency for that view as well.
For example a playback control which needs data to update the view. Doing this process manually can become quite a complex endeavour very quickly.
But just like SwiftUI views are declarative, data dependencies are as well.
There is no manual synchronization or validation of data. What!!!!!. How can this be and how does this work. Because that would be truly amazing.
A simple refresher:
| Declarative UI is like saying what you need. Such as I need “Scrambled eggs with toast.”. Imperitive UI would be explaining how to make the toast, how to make the scrambled eggs. How to mix the ingredients in the correct order to get the correct result. Missing a step could prove potentially disasterous. |
It also means that each piece of data living in your view hierarchy has a source of truth. The data can be coming from within the view hierarchy or from an external source which would be most of the case in real world applications.
This leads to the second premise Apple has focused on:
Each piece of data should have a single source of truth.
Let’s take a look the types of data we can have in a view.
- A simple property passed in through by dependency injection or simply a modelled property from a parent. This should only be a read-only property.
- The next example could be a
toggleon a property. Or a change throughfilteringetc. When trying to update the UI and when trying to compile our code we will get a compile-time error.
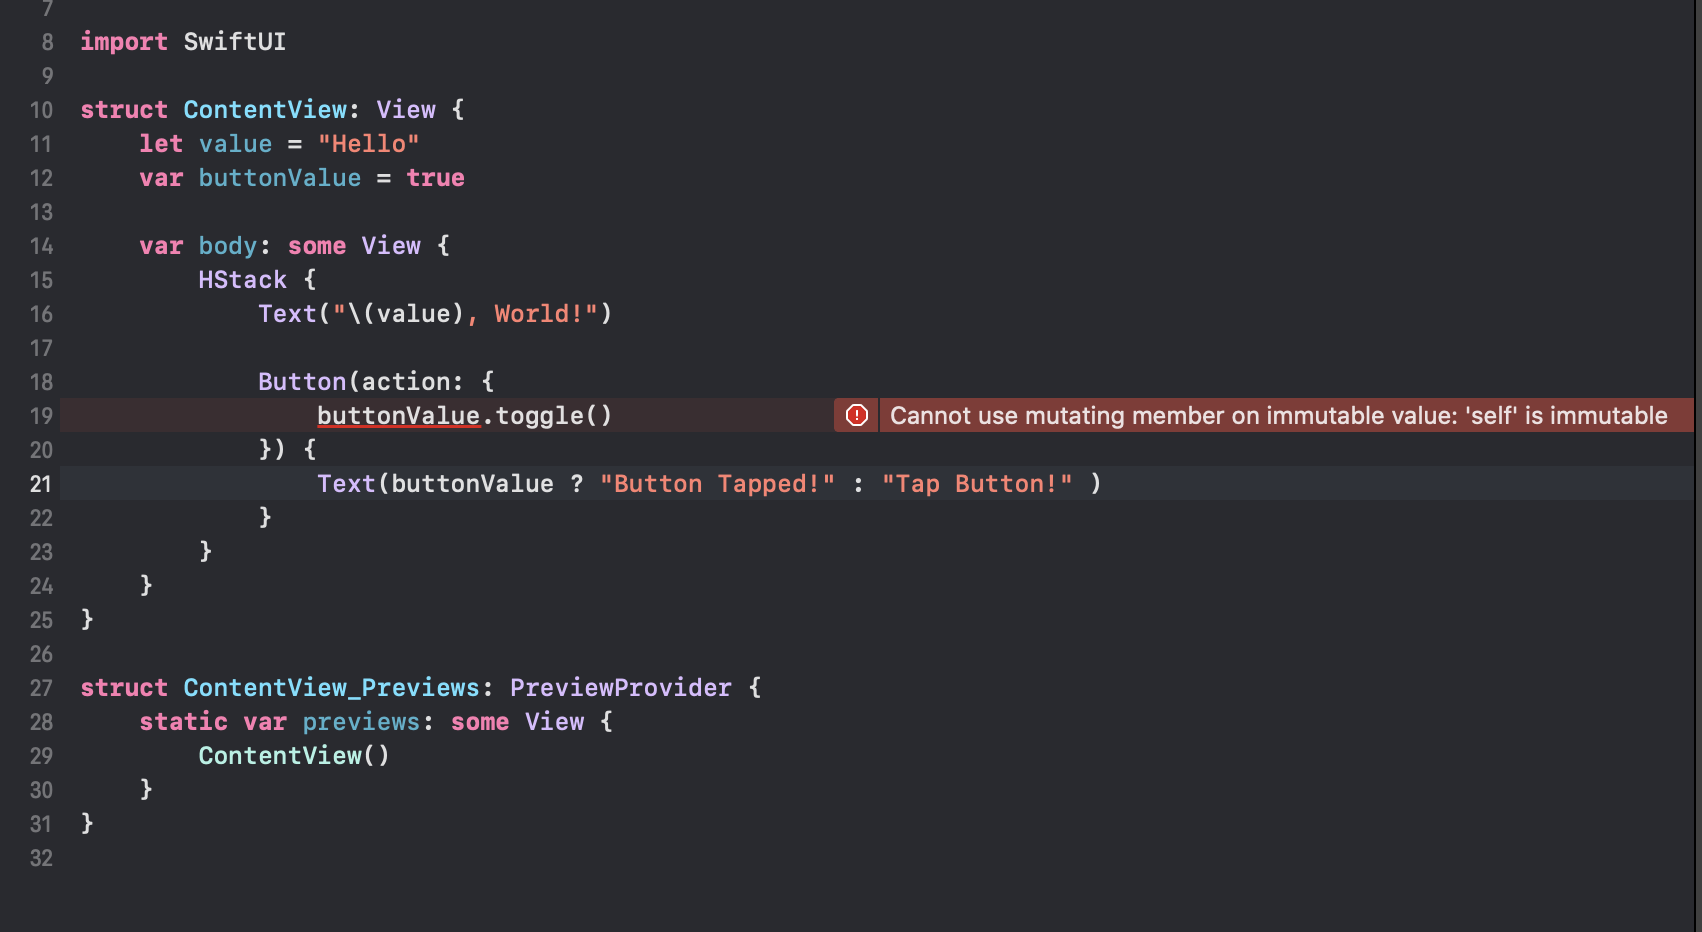
We can add the @State property wrapper onto the buttonValue property to let SwiftUI know that this property is capable of changing through time and that the view is dependant on it.
Apple says
| And you might wonder, how does this work? What is this additional behavior with state? When you state the framework, you allocate the persistent storage for the variable on the view we have and track it as a dependency because if the system is creating storage for you, you always have to specify an initial constant value. |
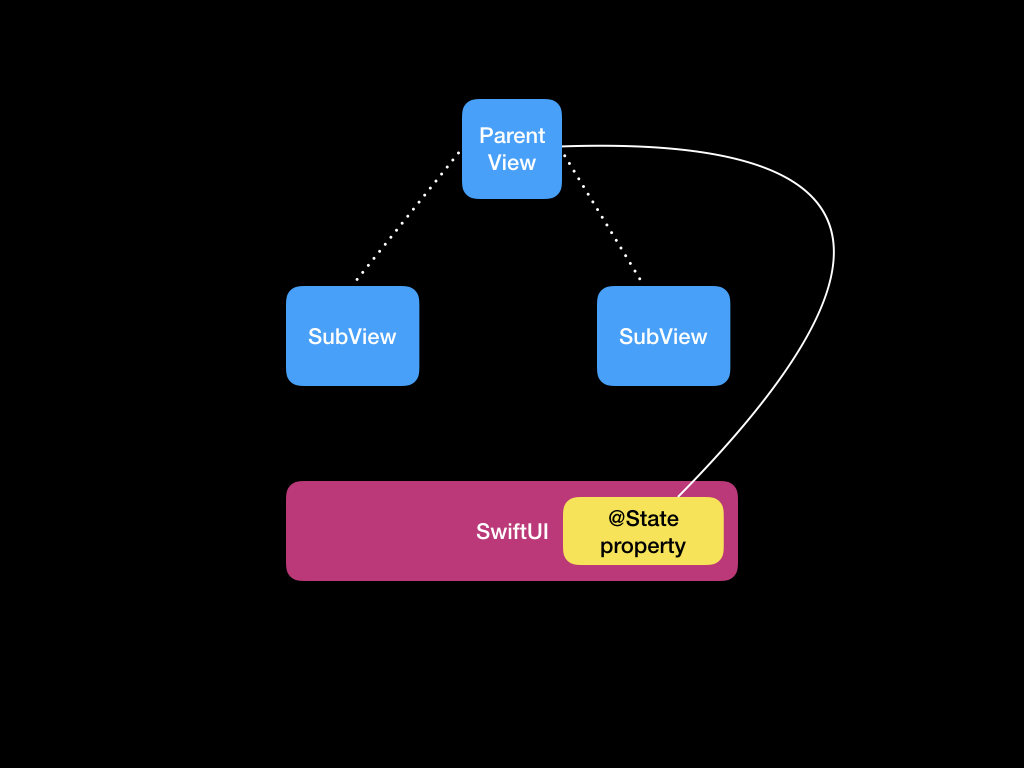
So this can be described in the diagram below.
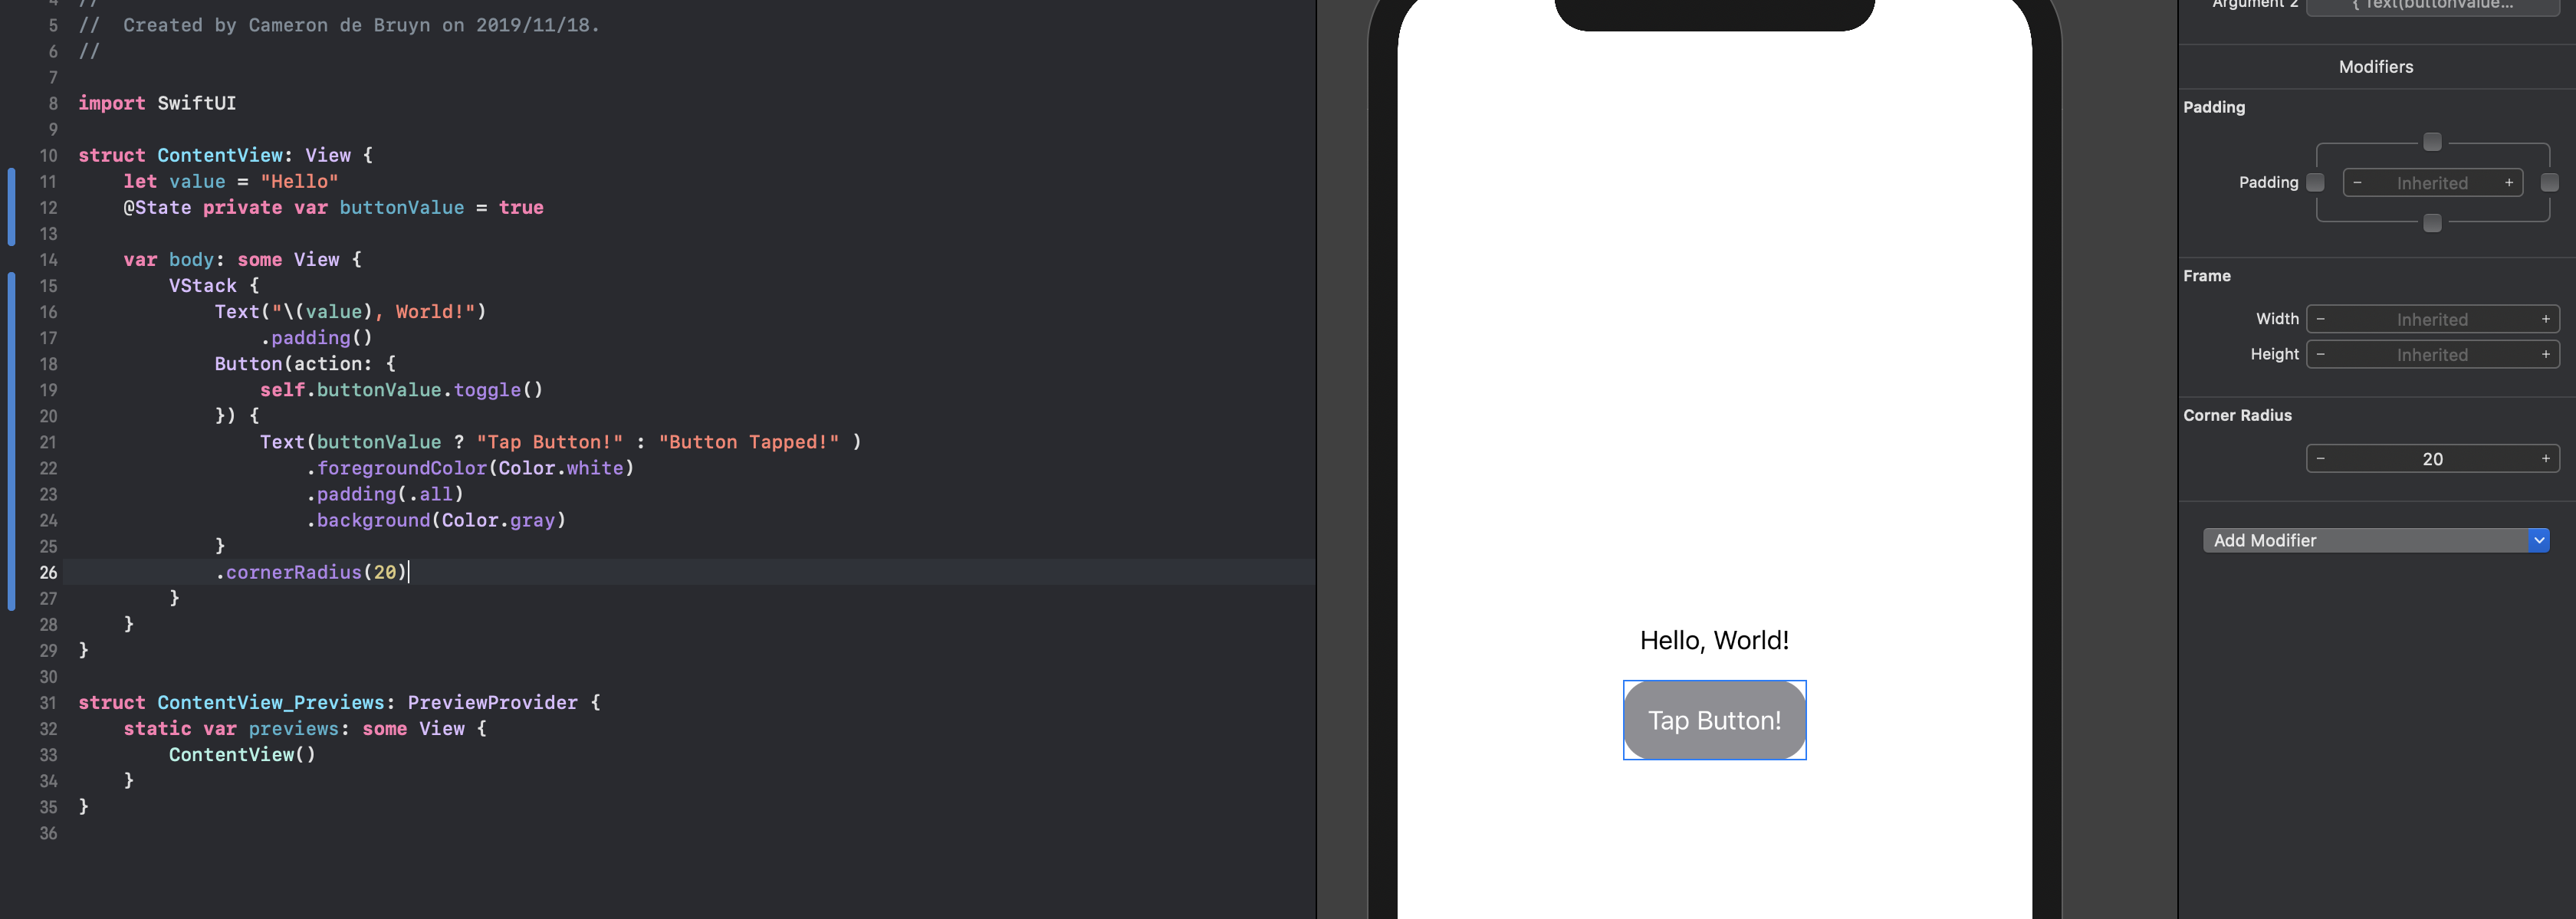
So now our code will look something like this and will be able to compile.
import SwiftUI

struct ContentView: View {
    let value = "Hello"
    @State private var buttonValue = true

    var body: some View {
        HStack {
            Text("\(value), World!")

            Button(action: {
                self.buttonValue.toggle()
            }) {
                Text(buttonValue ? "Tap Button!" : "Button Tapped!" )
            }
        }
    }
}

struct ContentView_Previews: PreviewProvider {
    static var previews: some View {
        ContentView()
    }
}
Apple suggests making @State properties private since it’s property is associated within the view.
When the user interacts with the button, the framework will execute it’s action and meet at some state. The view and all its subchildren will then be updated with the new state. This is what Apple means by they manage the dependency for you.
An important take away:
Each property or @State acts as a single source of truth. |
Another important takeaway is that:
| Your view is a function of state and not a sequence of events. |
The framework is able to detect a change in @State and will refresh and generate a new version of your View Hierarchy. Traditionally, you respond to some event by directly mutating your view hierarchy. For example, by adding or removing a subview or changing the alpha. Instead, in SwiftUI, you mutate some state and the state work as a source of truth from which you derive your view.
Now let’s suppose I came up with this simple code.
Now after refactoring this to create a smaller subview for example sake we end up with something like this.
import SwiftUI

struct ContentView: View {

    var body: some View {
        VStack {
            SmallerSubView()
        }
    }
}

struct SmallerSubView: View {
    let value = "Hello"
    @State private var buttonValue = true

    var body: some View {
        Group {
            Text("\(value), World!")
                .padding()
            Button(action: {
                self.buttonValue.toggle()
            }) {
                Text(buttonValue ? "Tap Button!" : "Button Tapped!" )
                    .foregroundColor(Color.white)
                    .padding(.all)
                    .background(Color.gray)
            }
            .cornerRadius(20)
        }
    }
}

struct ContentView_Previews: PreviewProvider {
    static var previews: some View {
        ContentView()
    }
}
I make use of a Group since the body property requires that you only return a single view.
Can spot the problem here?
So our view hierarchy now looks like this.
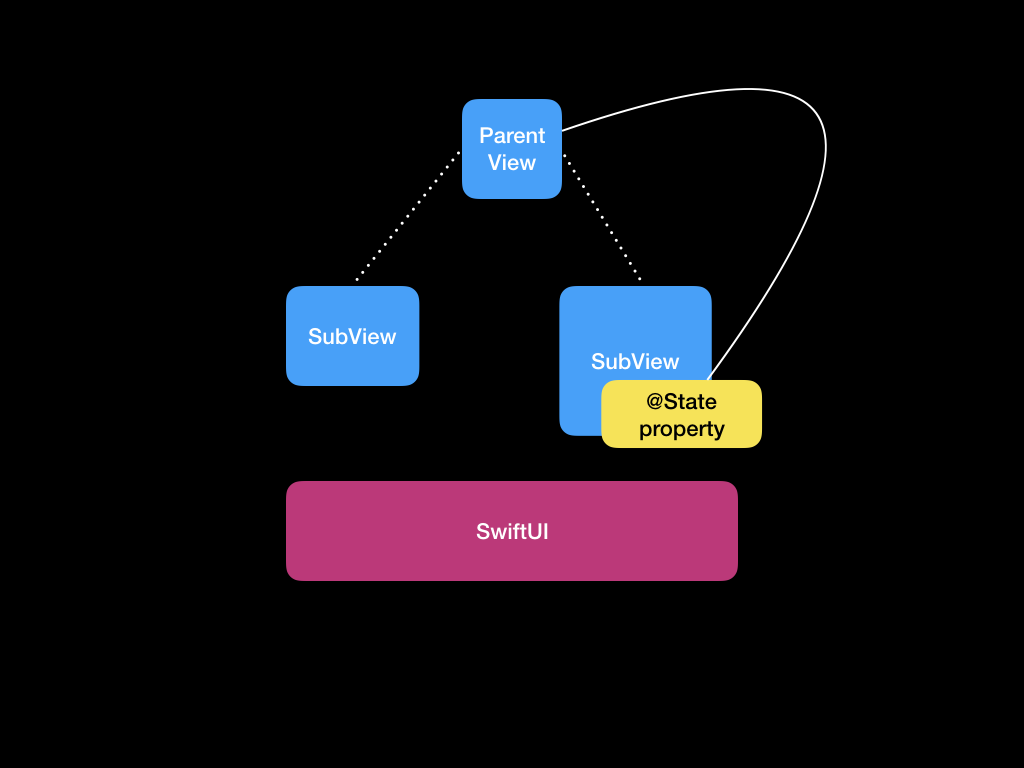
So now we have created another source of truth. So @State is not the correct tool to be using here.
| By using the Binding Property Wrapper, you define an explicit dependency to a source of truth without owning it. Additionally, you don’t need to provide an initial value because the binding can be derived from a state. |
So how does this now look:
import SwiftUI

struct ContentView: View {

    @State private var buttonValue = false

    var body: some View {
        VStack {
            SmallerSubView(buttonValue: $buttonValue)
        }
    }
}

struct SmallerSubView: View {
    let value = "Hello"
    @Binding var buttonValue: Bool

    var body: some View {
        Group {
            Text("\(value), World!")
                .padding()
            Button(action: {
                self.buttonValue.toggle()
            }) {
                Text(buttonValue ? "Tap Button!" : "Button Tapped!" )
                    .foregroundColor(Color.white)
                    .padding(.all)
                    .background(Color.gray)
            }
            .cornerRadius(20)
        }
    }
}

struct ContentView_Previews: PreviewProvider {
    static var previews: some View {
        ContentView()
    }
}
We pass the $buttonValue through as a property binding. Now we can appreciate that there is no need to moniter state between the @Binding and @State wrappers. This is simply and elegantly done by a reference between the two.
| In fact this eliminates the need for a View Controller |
So as explained by Apple:
If you take a look at the API for component like Toggle, TextField and Slider, they all expect a binding. The framework keeps you in control of where the source of truth live. You create the data and give that to the component, a reference to it without ever duplicating that information or manually keep that in sync.

But remember, in SwiftUI, your views are a function of some state.

There's a single funnel point for all of your changes. And what this means is that SwiftUI reacts to these external changes the same way it does to user interaction.

So when a timer fires or a notification is received, the process looks pretty much the same. We create an action, perform a mutation on some state, we get a new copy of the view and that's rerendered to the user. And in SwiftUI, we have a single abstraction for representing these external events. And it's called a Publisher.
The publisher comes with the new Combine framework. As remarked in their talk. The publisher should emit on the main thread.
Now with a small pubilsher a created. This is how we would be setup for external data.
import SwiftUI
import Combine

struct ContentView: View {

    let publisher = ExternalDataPubilsher()

    @State private var text: String = "Hello"
    @State private var buttonValue: Bool = false

    var body: some View {
        VStack {
            Text("\(text), World!")
                .padding()
            SmallerSubView(buttonValue: $buttonValue)
        }
        .onReceive(publisher.value) { value in
            self.text = value
        }
    }
}

struct SmallerSubView: View {
    @Binding var buttonValue: Bool

    var body: some View {
        Group {
            Button(action: {
                self.buttonValue.toggle()
            }) {
                Text(buttonValue ? "Tap Button!" : "Button Tapped!" )
                    .foregroundColor(Color.white)
                    .padding(.all)
                    .background(Color.gray)
            }
            .cornerRadius(20)
        }
    }
}

class ExternalDataPubilsher: ObservableObject  {
    var value = PassthroughSubject<String, Never>()
}

struct ContentView_Previews: PreviewProvider {
    static var previews: some View {
        ContentView()
    }
}
More to add here..
Constructive feedback is welcome. If you notice something wrong with the article. Please send me message so that I can rectify it.